- 1 System Requirements for Smart Reseller Billing Panel
- 1.1 System Requirements
- 2 Installation Instructions
- 2.1 Download the zip file from your Client Area
- 2.2 Upload it on your Server and Extract it
- 2.3 Enter the license key
- 2.4 Activate the module
- 3 Make a Connection between Reseller Xtream UI Panel and Smart IPTV Reseller Billing Panel
Smart Reseller Billing Panel is a hosted solution that can be installed on your Web Server.
It needs to have VPS hosting or Dedicated Hosting or cPanel with following requirements:
System Requirements
Most current web servers* with PHP & MySQL installed will be capable of running Smart Reseller Billing Panel. The following table shows the minimum and recommended system requirements for running it 3.0 version and later.
Requirement
|
Minimum
|
Recommended
|
Installation Instructions - Smart Reseller Billing Panel Module for Xtream UI.
**IMPORTANT NOTE- Re-Captcha should be disabled**
Download the zip file from your Client Area
1. No need to tell you how to do that.....
Upload it on your Server and Extract it
We assume that you have installed WHMCS Instance.
1. Upload the zip file to your WHMCS Root directory (where modules, templates are placed)
2. Extract the zip files
3. Make sure your modules are uploaded on their intended places
xtreamUIpanel: it should be uploaded /<whmcs-dir>/modules/servers/xtreamUIpanel.
xtreamUIdashboard: It should be uploaded here /<whmcs-dir>/modules/addons/xtreamUIdashboard.
Enter the license key
Make sure you have your license key
1. In order to get your module working, you must enter the license key.
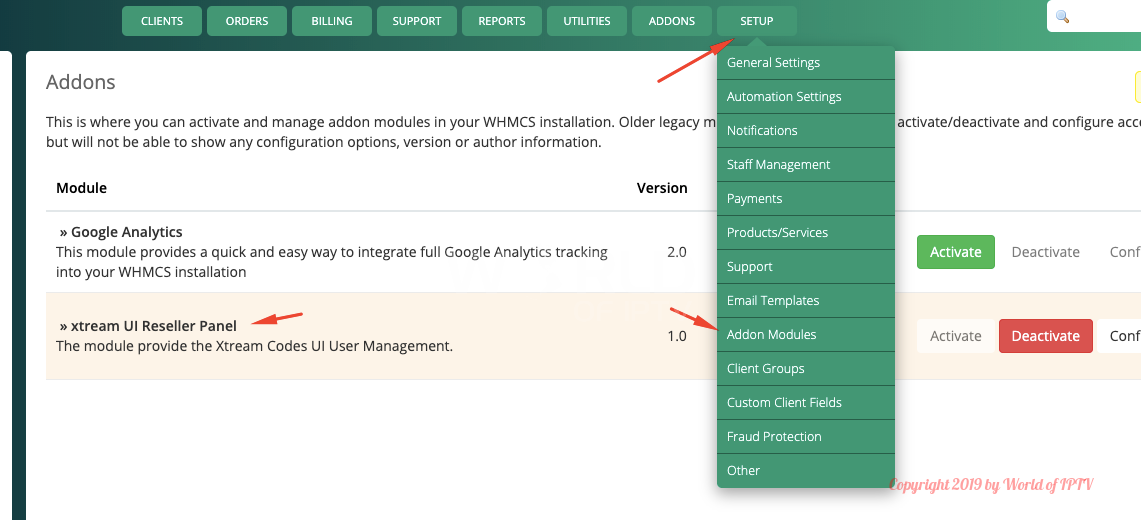
1) Add your license key - Login to Admin area > Setup tab > Addon Modules >xtream UI Reseller Panel
Place R-xxxxxxx with your license key
2. Open this file and enter your license key in this file.
Activate the module
1. Login to Admin Area -> Setup -> Addons Modules
2. Find out our module "WSResellerPanelDashboard" and activate it.
3. You have to click on "configure" button to give the Access Control to your administrator
Make a Connection between Xtream UI Panel and Smart Reseller IPTV Billing Panel
How to add Xtream UI Reseller details?
Or
How to make the connection between Smart Reseller IPTV Billing Panel and Reseller Xtream UI Panel?
Or
How to connect Smart Reseller IPTV Billing Panel to Reseller Xtream UI?
Or
How to link your Reseller Xtream UI with our Smart Reseller IPTV Billing Panel
Note:Before making connection or adding server, xtreamUIdashboard modules must be installed with valid license key
Requirements: Should have following things before making connection
- Xtream UI Reseller Panel Credentials:
✔Reseller Username
✔Reseller Password
- MAG Portal:http://site.com/c/
Step by Step instructions to make it quickly:
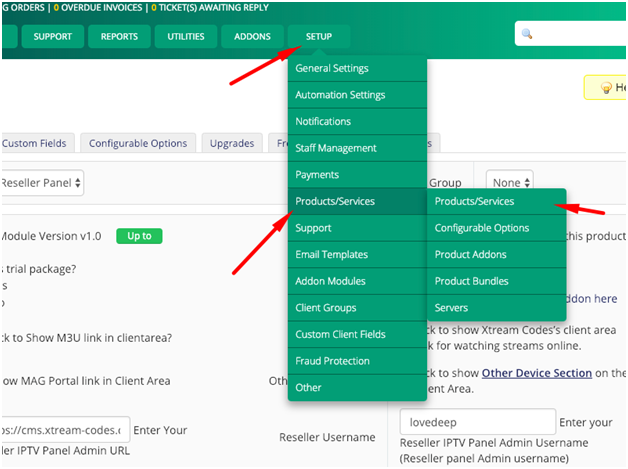
- Login to Admin Dashboard - (http://yoursite.com/<billing-panel>/admin)
- Navigate to Setup -> Products/Services -> Products/Services
· Click on Create A New Group (skip if you have already created a group)
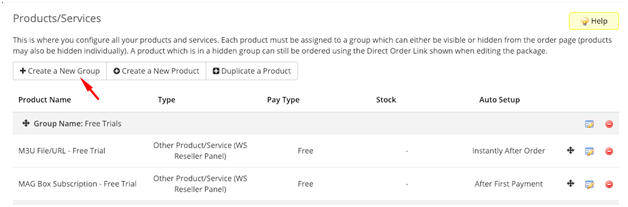
✔ Product Group Name= Anything (suggested: Free Trials )
✔ Product Group Headline - anything (eg. Select Your Perfect Product )
✔ Save changes (leave other things as default )
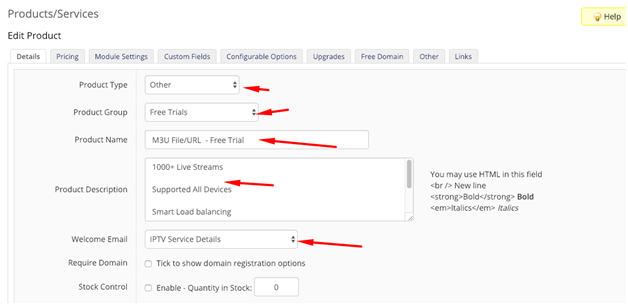
· Click on Add A New Product and enter the required fields
✔Product Type :Other
✔Product Group : <select your group you have created already> (e.g :Free Trials )
✔Product Name = Anything ( e.g - 1 Day Free Trial or 24 Hrs Trial m3u play list All Packages)
✔Product Description = anything that will show on order form for your customers
✔Welcome Email = IPTV Services Details ( IMPORTANT )
✔ Uncheck this option - Require Domain - (Important )
✔ Click on the next Tab - Pricing
✔Payment Type : Free (For only Free Trial Products)
✔ Auto Terminate/Fixed Term = enter the number of days you want to give free trial ( e.g = 1 )
✔ Go to next Tab – Module Settings and configure it as :-
· Module Name - Selec t “ xtreamUIpanel ”
- Product - Streamline - It refers – What type of product is this? what should be created once this product is ordered ?(Streamline, MAG Device)
- Trial Package : Is this trial package? (For `Yes` see the text box for entering trial period)
- M3U link: Tick to Show M3U link in the client area?
- Select package: Here we can assign package to this product. Click on “Assign package to this product” then it will load the available packages then you can select accordingly. (No need to enter package ID manually).
- Watch Streams : Tick to Show “Watch Streams” link in client area? When a user logs in their client area, they can see “Watch Stream” link that redirects to X.C Panel Client area and logs user in. (Web TV Feature)
- MAG Portal link = optional if you want to show MAG Portal on the Client Area
- Recommended -Click Here to Create Required Custom Fields : It will create required custom fields. (like Username )
- Automatically setup the product as soon as an order is placed = For Free Trial ,you can set this option if you want to activate free trial automated as soon as customer places the order
- Enter the required details
✔Reseller Username - Username
✔Reseller Password – Password
✔Mag Portal –
http://yourdns:port✔ Save changes
It’s all done. Now you can place an order from the website and it should create the service to your Xtream UI Reseller Panel as well.
