ionCube loader is a PHP extension (module) that enables PHP to load files protected and encoded using ionCube Encoder software, which is mostly used in commercial software applications to protect their source code and prevent it from being visible and detectable.
this article, we will explain how to install and configure ionCube Loader with PHP in Debian and Ubuntu distributions.
Prerequisites:
A Ubuntu or Debian server running with a web server (Apache or Nginx) along with a PHP installed. If you don’t have a web server and PHP on your system, you can install them using apt package manager as shown.
Step 1: Install Apache Web Server with PHP
1. If you already have a running web server Apache or Nginx with PHP installed on your system, you can jump to Step 2, otherwise use the following apt command to install them.
-------------------- Install Apache with PHP --------------------
$ sudo apt install apache2 php7.0 php7.0-fpm php7.0-cli
2. Once you’ve installed Apache with PHP on your system, you can start the webserver and activate it to auto-start at system boot using following commands.
-------------------- Start Apache Web Server --------------------
$ sudo systemctl start apache2
$ sudo systemctl enable apache2
Step 2: Download IonCube Loader
3. Go to the inocube’s website and download the installation files, but before that, you need to check whether your Linux distribution is running on 64-bit or 32-bit architecture using the following command.
-------------------- For 64-bit System --------------------
$ cd /tmp
$ wget https://downloads.ioncube.com/loader_downloads/ioncube_loaders_lin_x86-64.tar.gz
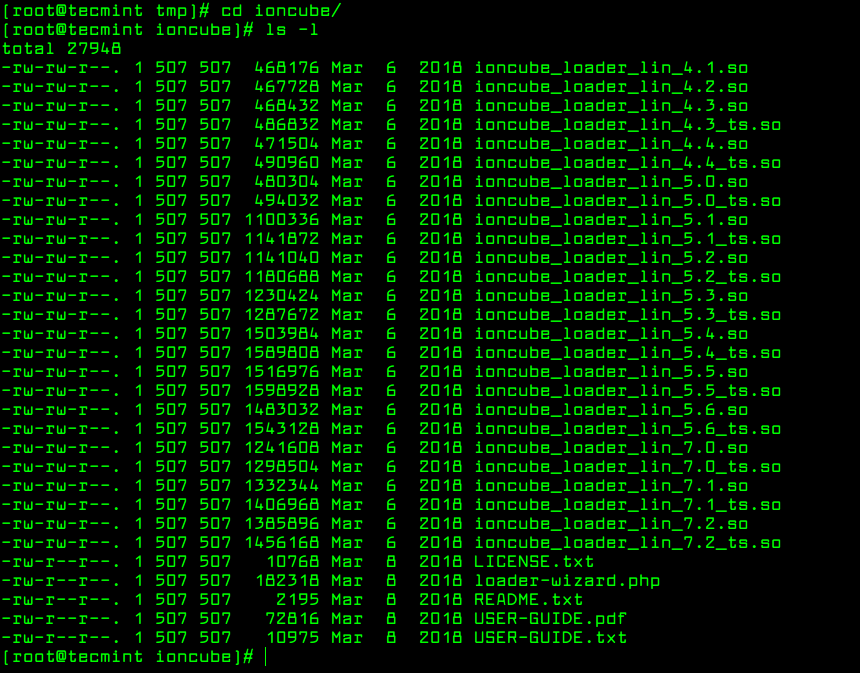
4. Then uncompress the downloaded file using the tar command and switch into the unzipped folder. Then run the ls command to list the various ioncube loader files for different PHP versions.
$ tar -zxvf ioncube_loaders_lin_x86*
$ cd ioncube/
$ ls -l
Step 3: Install ionCube Loader for PHP
5. In the above screenshot, you will see various ioncube loader files for different PHP versions, you need to select the right ioncube loader for your installed PHP version on your server. To know the currently installed PHP version on your server, run the command.
$ php -v

The above screenshot clearly tells that the system is using PHP 7.0.25 version, in your case, it should be a different version.
6. Next, find the location of the extension directory for PHP version 7.0.25, it is where the ioncube loader file will be installed.
$ php -i | grep extension_dir

extension_dir => /usr/lib/php/20151012 => /usr/lib/php/20151012
7. Next we need to copy ioncube loader for our PHP 7.0.25 version to the extension directory (/usr/lib/php/20151012).
$ sudo cp /tmp/ioncube/ioncube_loader_lin_7.0.so /usr/lib/php/20151012
Note: Make sure to replace the PHP version and extension directory in the above command according to your system configuration.
Step 4: Configure ionCube Loader for PHP
8. Now we need to configure ioncube loader to work with PHP, in the php.ini file. Debian and Ubuntu use different php.ini files for PHP CLI and PHP-FPM as shown.
$ sudo vi /etc/php/7.0/cli/php.ini 		#for PHP CLI
$ sudo vi /etc/php/7.0/fpm/php.ini		#for PHP-FPM & Nginx
$ sudo vi /etc/php/7.0/apache2/php.ini	        #for Apache2
Then add below line as the first line in the respective php.ini files.
zend_extension = /usr/lib/php/20151012/ioncube_loader_lin_7.0.so
Note: Make sure to replace the extension directory location and PHP version in the above command according to your system configuration.
9. Then save and exit the file. Now we need to restart the Apache or Nginx web server for the ioncube loaders to come into effect.
-------------------- Start Apache Web Server --------------------
$ sudo systemctl restart apache2
That’s It! In order to secure PHP files, you need to have IonCube loader installed and configured with your installed PHP version, as shown above. We hope that everything worked fine without any issues, otherwise, use the feedback form below to send us your queries.
